In this tutorial we are going to see about submit form with check box and read the check box value in Servlet.
Step by step instruction given below.
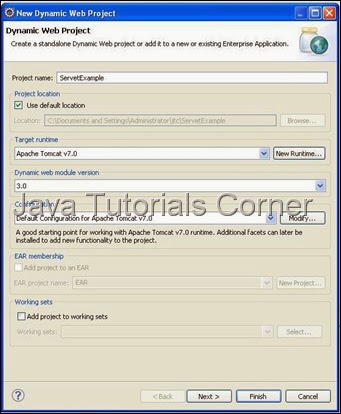
1. Create new Dynamic web project by choosing File –> New –> Dynamic Web Project .
2. Create the Project called ServletExample as given below.

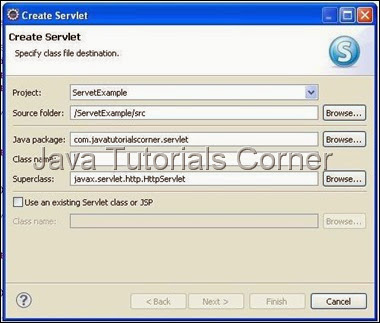
3. Create package called com.javatutorialscorner.servlet under ServletExample.
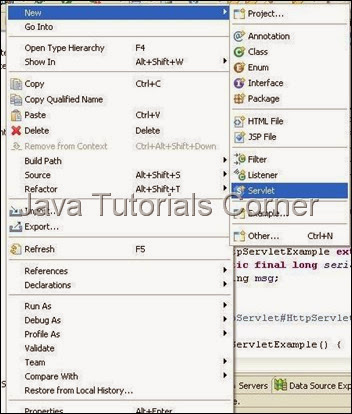
4. Create Servlet called CheckBoxFormSubmit as shown in figure.


5. Click Next it will show URL mapping.You can edit Servlet URL if you need.
6. Click Next it will show methods available in HttpServlet. Select appropriate method you need.

7. By default your servlet will be mapped in web.xml, if your servlet not mapped in your web.xml use the following configuration to map the servlet in your web.xml
Servlet Mapping
web.xml
8. Add the required code inside doPost() method.
CheckBoxFormSubmit.java
9. Create html page in WebContent folder
checkboxform.html
In above html page in form tag method="post" to mention the form submit using post method.The default method to submit form is GET.
10. Now save and Run the servlet, Run As –> Run on Server – Select your web Server to run the servlet. ( see How to configure tomcat in eclipse)
http://www.javatutorialcorner.com/2014/03/how-to-configure-tomcat-in-eclipse.html
11.call the following URL.
http://localhost:8080/ServletExample/checkboxform.html
Output
HTML page - Check box Form
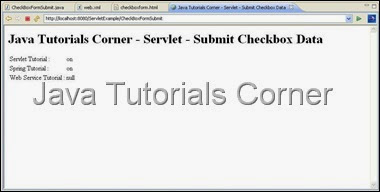
 After form Submit

Step by step instruction given below.
1. Create new Dynamic web project by choosing File –> New –> Dynamic Web Project .
2. Create the Project called ServletExample as given below.

3. Create package called com.javatutorialscorner.servlet under ServletExample.
4. Create Servlet called CheckBoxFormSubmit as shown in figure.


5. Click Next it will show URL mapping.You can edit Servlet URL if you need.
6. Click Next it will show methods available in HttpServlet. Select appropriate method you need.

7. By default your servlet will be mapped in web.xml, if your servlet not mapped in your web.xml use the following configuration to map the servlet in your web.xml
Servlet Mapping
<servlet>
    <servlet-name>Your Servlet Name</servlet-name>
    <servlet-class>Fully Qulaified Servlet Class Name</servlet-class>
  </servlet>
  <servlet-mapping>
    <servlet-name>Your Servlet Name</servlet-name>
    <url-pattern>/URL to Call Servlet</url-pattern>
  </servlet-mapping>
web.xml
<?xml version="1.0" encoding="UTF-8"?>
<web-app xmlns:xsi="http://www.w3.org/2001/XMLSchema-instance" xmlns="http://java.sun.com/xml/ns/javaee" xmlns:web="http://java.sun.com/xml/ns/javaee/web-app_2_5.xsd" xsi:schemaLocation="http://java.sun.com/xml/ns/javaee http://java.sun.com/xml/ns/javaee/web-app_3_0.xsd" id="WebApp_ID" version="3.0">
  <display-name>ServetExample</display-name>
  <welcome-file-list>
    <welcome-file>index.html</welcome-file>
    <welcome-file>index.htm</welcome-file>
    <welcome-file>index.jsp</welcome-file>
    <welcome-file>default.html</welcome-file>
    <welcome-file>default.htm</welcome-file>
    <welcome-file>default.jsp</welcome-file>
  </welcome-file-list>
  <servlet>
    <servlet-name>CheckBoxFormSubmit</servlet-name>
    <servlet-class>com.javatutorialscorner.servlet.CheckBoxFormSubmit</servlet-class>
  </servlet>
  <servlet-mapping>
    <servlet-name>CheckBoxFormSubmit</servlet-name>
    <url-pattern>/CheckBoxFormSubmit</url-pattern>
  </servlet-mapping>
</web-app>
8. Add the required code inside doPost() method.
CheckBoxFormSubmit.java
package com.javatutorialscorner.servlet;

import java.io.IOException;
import java.io.PrintWriter;

import javax.servlet.ServletException;
import javax.servlet.http.HttpServlet;
import javax.servlet.http.HttpServletRequest;
import javax.servlet.http.HttpServletResponse;

/**
 * Servlet implementation class CheckBoxFormSubmit
 */

public class CheckBoxFormSubmit extends HttpServlet {
 private static final long serialVersionUID = 1L;

 /**
  * @see HttpServlet#HttpServlet()
  */
 public CheckBoxFormSubmit() {
  super();
  // TODO Auto-generated constructor stub
 }

 /**
  * @see HttpServlet#doGet(HttpServletRequest request, HttpServletResponse
  *      response)
  */
 protected void doGet(HttpServletRequest request,
   HttpServletResponse response) throws ServletException, IOException {
  // TODO Auto-generated method stub
 }

 /**
  * @see HttpServlet#doPost(HttpServletRequest request, HttpServletResponse
  *      response)
  */
 protected void doPost(HttpServletRequest request,
   HttpServletResponse response) throws ServletException, IOException {
  // TODO Auto-generated method stub
  response.setContentType("text/html");
  PrintWriter writer = response.getWriter();
  writer.write("<!DOCTYPE html PUBLIC \"-//W3C//DTD HTML 4.01 Transitional//EN\" \"http://www.w3.org/TR/html4/loose.dtd\">\n"
    + "<html><head><meta http-equiv=\"Content-Type\" content=\"text/html; charset=ISO-8859-1\"><title>Java Tutorials Corner - Servlet - Submit Checkbox Data</title>"
    + "</head><body><h1>Java Tutorials Corner - Servlet - Submit Checkbox Data</h1><table><tr>"
    + "<td>Servlet Tutorial : </td><td>"
    + request.getParameter("servlet")
    + "</td></tr><tr><td>Spring Tutorial : </td><td>"
    + request.getParameter("spring")
    + "</td></tr>"
    + "<tr><td>Web Service Tutorial : </td><td>"
    + request.getParameter("webservice")
    + "</td></tr></table></body></html>");
 }

}
9. Create html page in WebContent folder
checkboxform.html
<!DOCTYPE html PUBLIC "-//W3C//DTD HTML 4.01 Transitional//EN" "http://www.w3.org/TR/html4/loose.dtd">
<html>
<head>
<meta http-equiv="Content-Type" content="text/html; charset=ISO-8859-1">
<title>Java Tutorials Corner - Submit Checkbox Data</title>
</head>
<body>
<h1>Java Tutorials Corner - Servlet - Submit Checkbox Data</h1>
<form action="CheckBoxFormSubmit" method="post">

<table>
<tr>
<td><input type="checkbox" name="servlet" checked="checked"/> Servlet Tutorial</td>
</tr>
<tr>
<td><input type="checkbox" name="spring" checked="checked"/> Spring Tutorial</td>
</tr>
<tr>
<td><input type="checkbox" name="webservice"/>Web Service Tutorial</td>
</tr>
</table>
<input type="submit" value="Submit"/>
</form>
</body>
</html>
In above html page in form tag method="post" to mention the form submit using post method.The default method to submit form is GET.
10. Now save and Run the servlet, Run As –> Run on Server – Select your web Server to run the servlet. ( see How to configure tomcat in eclipse)
http://www.javatutorialcorner.com/2014/03/how-to-configure-tomcat-in-eclipse.html
11.call the following URL.
http://localhost:8080/ServletExample/checkboxform.html
Output
HTML page - Check box Form
 After form Submit


0 comments:
Post a Comment