In this tutorial we are going to see about File upload using Servlet 3 @MultipartConfig Annotation. In previous tutorial I wrote File upload using Apache File Upload API click here to see File Upload using Apache File upload API
MultipartConfig Annotation
The @MultipartConfig annotation supports the following optional attributes:
location: An absolute path to a directory on the file system. The location attribute does not support a path relative to the application context. This location is used to store files temporarily while the parts are processed or when the size of the file exceeds the specified fileSizeThreshold setting. The default location is "".
fileSizeThreshold: The file size in bytes after which the file will be temporarily stored on disk. The default size is 0 bytes.
MaxFileSize: The maximum size allowed for uploaded files, in bytes. If the size of any uploaded file is greater than this size, the web container will throw an exception (IllegalStateException). The default size is unlimited.
maxRequestSize: The maximum size allowed for a multipart/form-data request, in bytes. The web container will throw an exception if the overall size of all uploaded files exceeds this threshold. The default size is unlimited.
For, example, the @MultipartConfig annotation could be constructed as follows:
Instead of using the @MultipartConfig annotation to hard-code these attributes in your file upload servlet, you could add the following as a child element of the servlet configuration element in the web.xml file.
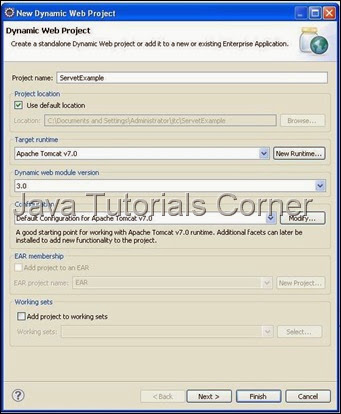
1. Create new Dynamic web project by choosing File –> New –> Dynamic Web Project .
2. Create the Project called ServletExample as given below.

3. Create package called com.javatutorialscorner.servlet under ServletExample.
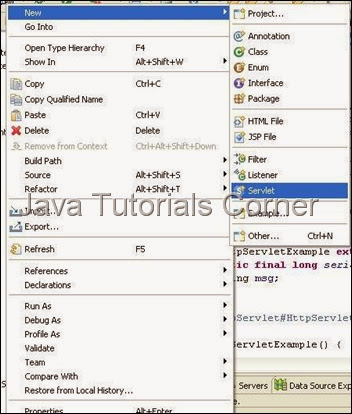
4. Create Servlet called Servlet3FileUpload as shown in figure.


5. Click Next it will show URL mapping.You can edit Servlet URL if you need.
6. Click Next it will show methods available in HttpServlet. Select appropriate method you need.

7. In Servlet 3 @WebServlet (instead of web.xml)Annotation used for URL mapping . URL mapping will be look like this.
8. Add the required code inside doPost() method.
Servlet3FileUpload.java
9. Create html page in WebContent folder
fileupload.html
In above html page in form tag method="post" to mention the form submit using post method.The default method to submit form is GET.
9. Now save and Run the servlet, Run As –> Run on Server – Select your web Server to run the servlet. ( see How to configure tomcat in eclipse)
http://www.javatutorialcorner.com/2014/03/how-to-configure-tomcat-in-eclipse.html
10.call the following URL .
http://localhost:8080/ServletExample/fileupload.html
Output
 After File Uploaded

MultipartConfig Annotation
The @MultipartConfig annotation supports the following optional attributes:
location: An absolute path to a directory on the file system. The location attribute does not support a path relative to the application context. This location is used to store files temporarily while the parts are processed or when the size of the file exceeds the specified fileSizeThreshold setting. The default location is "".
fileSizeThreshold: The file size in bytes after which the file will be temporarily stored on disk. The default size is 0 bytes.
MaxFileSize: The maximum size allowed for uploaded files, in bytes. If the size of any uploaded file is greater than this size, the web container will throw an exception (IllegalStateException). The default size is unlimited.
maxRequestSize: The maximum size allowed for a multipart/form-data request, in bytes. The web container will throw an exception if the overall size of all uploaded files exceeds this threshold. The default size is unlimited.
For, example, the @MultipartConfig annotation could be constructed as follows:
@MultipartConfig(location="/tmp", fileSizeThreshold=1024*1024, maxFileSize=1024*1024*5, maxRequestSize=1024*1024*5*5)
Instead of using the @MultipartConfig annotation to hard-code these attributes in your file upload servlet, you could add the following as a child element of the servlet configuration element in the web.xml file.
<multipart-config>
    <location>/tmp</location>
    <max-file-size>20848820</max-file-size>
    <max-request-size>418018841</max-request-size>
    <file-size-threshold>1048576</file-size-threshold>
</multipart-config>
1. Create new Dynamic web project by choosing File –> New –> Dynamic Web Project .
2. Create the Project called ServletExample as given below.

3. Create package called com.javatutorialscorner.servlet under ServletExample.
4. Create Servlet called Servlet3FileUpload as shown in figure.


5. Click Next it will show URL mapping.You can edit Servlet URL if you need.
6. Click Next it will show methods available in HttpServlet. Select appropriate method you need.

7. In Servlet 3 @WebServlet (instead of web.xml)Annotation used for URL mapping . URL mapping will be look like this.
@WebServlet("/Servlet3FileUpload")
8. Add the required code inside doPost() method.
Servlet3FileUpload.java
package com.javatutorialscorner.servlet;

import java.io.File;
import java.io.IOException;
import java.io.PrintWriter;

import javax.servlet.ServletException;
import javax.servlet.annotation.MultipartConfig;
import javax.servlet.annotation.WebServlet;
import javax.servlet.http.HttpServlet;
import javax.servlet.http.HttpServletRequest;
import javax.servlet.http.HttpServletResponse;
import javax.servlet.http.Part;

/**
 * Servlet implementation class Servlet3FileUpload
 */
@WebServlet("/Servlet3FileUpload")
@MultipartConfig(fileSizeThreshold = 1024 * 1024 * 5, maxFileSize = 1014 * 1024 * 25, maxRequestSize = 1024 * 1024 * 50)
public class Servlet3FileUpload extends HttpServlet {
 private static final long serialVersionUID = 1L;

 /**
  * @see HttpServlet#HttpServlet()
  */
 public Servlet3FileUpload() {
  super();
  // TODO Auto-generated constructor stub
 }

 /**
  * @see HttpServlet#doGet(HttpServletRequest request, HttpServletResponse
  *      response)
  */
 protected void doGet(HttpServletRequest request,
   HttpServletResponse response) throws ServletException, IOException {
  // TODO Auto-generated method stub
 }

 /**
  * @see HttpServlet#doPost(HttpServletRequest request, HttpServletResponse
  *      response)
  */
 protected void doPost(HttpServletRequest request,
   HttpServletResponse response) throws ServletException, IOException {
  // TODO Auto-generated method stub
  String realPath = request.getServletContext().getRealPath("");
  String destinationUpload = realPath + File.separator + "JTC";
  String fileName = null;
  File file = new File(destinationUpload);
  if (!file.exists())
   file.mkdirs();
  for (Part part : request.getParts()) {
   fileName = getUploadedFileName(part);
   part.write(destinationUpload + File.separator + fileName);
  }
  response.setContentType("text/html");
  PrintWriter writer = response.getWriter();
  writer.write("<!DOCTYPE html PUBLIC \"-//W3C//DTD HTML 4.01 Transitional//EN\" \"http://www.w3.org/TR/html4/loose.dtd\">\n"
    + "<html><head><meta http-equiv=\"Content-Type\" content=\"text/html; charset=ISO-8859-1\"><title>Java Tutorials Corner - Servlet3 - File Upload</title>"
    + "</head><body><h1>Java Tutorials Corner - Servlet3 - File Upload</h1><table><tr><td>"
    + fileName + " Uploaded Successfully</td></tr>");

 }

 private String getUploadedFileName(Part part) {
  // TODO Auto-generated method stub
  String header = part.getHeader("content-disposition");
  String[] tokens = header.split(";");
  String fileName = "";
  for (String headerParam : tokens) {
   if (headerParam.trim().startsWith("filename")) {

    fileName = headerParam.substring(headerParam.indexOf("=") + 2,
      headerParam.length() - 1);
   }

  }
  if (fileName.lastIndexOf("\\") >= 0) {

   fileName = fileName.substring(fileName.lastIndexOf("\\"));
  } else {
   fileName = fileName.substring(fileName.lastIndexOf("\\") + 1);
  }

  return fileName;
 }

}
9. Create html page in WebContent folder
fileupload.html
<!DOCTYPE html PUBLIC "-//W3C//DTD HTML 4.01 Transitional//EN" "http://www.w3.org/TR/html4/loose.dtd">
<html>
<head>
<meta http-equiv="Content-Type" content="text/html; charset=ISO-8859-1">
<title>Java Tutorials Corner - Servlet3 File Upload</title>
</head>
<body>
 <h1>Java Tutorials Corner - Servlet3 File Upload</h1>
 <form action="Servlet3FileUpload" method="post"
  enctype="multipart/form-data">
  <input type="file" name="file" size="50" /> <br /> <input
   type="submit" value="Submit" />
 </form>
</body>
</html>
In above html page in form tag method="post" to mention the form submit using post method.The default method to submit form is GET.
9. Now save and Run the servlet, Run As –> Run on Server – Select your web Server to run the servlet. ( see How to configure tomcat in eclipse)
http://www.javatutorialcorner.com/2014/03/how-to-configure-tomcat-in-eclipse.html
10.call the following URL .
http://localhost:8080/ServletExample/fileupload.html
Output
 After File Uploaded


0 comments:
Post a Comment